The 3-layer rule isn’t fashion advice. It’s how you stay dry, warm, and safe when the weather flips on you mid-trail. Nail it and you move in comfort all day. Mess it up and you sweat, chill, and burn energy fighting your own clothes. I live in Wellington-wind capital, four seasons before lunch-so good layering isn’t optional. Here’s a clear, no-nonsense guide to what the rule is, how to apply it, and what to pack for different conditions.
TL;DR: The 3-Layer Rule, Explained Simply
3 layer rule for hiking = three jobs on your body:
- Base layer: moves sweat off your skin so you don’t get clammy and cold.
- Mid layer: traps warm air so you keep your heat without adding bulk.
- Shell layer: blocks wind and rain so the other layers can work.
Quick picks:
- Base = merino or synthetic, never cotton. Fit close to skin.
- Mid = fleece or light insulated jacket (synthetic in wet areas, down in cold-dry).
- Shell = windproof or waterproof jacket with a hood; pit zips help.
Fast rules of thumb:
- Start slightly cool at the trailhead. If you’re warm and comfy at the car, you’ll sweat in 10 minutes.
- Vent first: unzip, roll sleeves, open pit zips. Only strip layers if venting isn’t enough.
- Hydrostatic head of 10,000 mm+ handles real rain; 20,000+ is better in long storms. Breathability (RET < 13 or high MVTR) matters if you move fast.
- Wind chill changes everything. A 15-25 km/h breeze can turn a mild day into a shiver-fest. Shell up sooner than you think in wind.
- Always carry a functional shell on exposed routes, even on bluebird days.
Trusted guidance lines up on this: REI Co-op’s Expert Advice (2024), the British Mountaineering Council’s clothing notes (2023), and the NZ Mountain Safety Council’s Plan My Walk guidance (2022) all say versions of the same thing: keep moisture off your skin, trap heat, block weather. The exact fabrics and features can change; the jobs do not.
How to Layer: Step-by-Step, From Home to Trail
Layering works when you plan for the real conditions you’ll feel on your skin, not just the app’s high temperature. Here’s a simple process you can run in three minutes.
-
Check the whole picture: temperature range, wind speed, rain chance, humidity, elevation gain, and how hard you’ll push. A slow family stroll in light rain feels warmer than a steep grind with a pack in the same rain.
-
Pick your base layer:
- Merino (150-200 gsm for mild/cool, 200-260 gsm for cold): comfy, resists stink, works across big temperature swings. Good for variable climates and multi-day trips.
- Synthetic (polyester or blends): dries fast, very durable, best when you’ll sweat hard in warm-to-hot weather.
- Avoid cotton: it holds water, cools you fast, and chafes when wet.
- Fit: close to skin without squeezing. Half-zip necks add powerful venting on climbs.
-
Choose your mid layer:
- Fleece: simple, cheap, and reliable. 100-weight for high-output or mild days; 200-weight for colder stops or slower pace. Grid fleece (perforated) breathes better on climbs.
- Active insulation (synthetic fill, air-permeable): great if you move in cold, mixed weather. It breathes better than traditional puffy jackets.
- Down jacket: very warm for the weight; best in cold, dry conditions or for rest stops. Loses loft when wet unless it’s water-resistant down and well-sheltered.
- Vest option: add core warmth without overheating arms; pairs well with a light fleece on shoulder-season days.
-
Add the shell layer:
- Wind shell (ultralight, non-waterproof): amazing for breezy ridgelines and fast hikes. 50-100 g garments can feel like a cheat code.
- Waterproof jacket (2.5L or 3L): 3L is tougher and comfier for long rain and bush-bashing; 2.5L is lighter for day hikes. Look for a good hood, hem and cuff adjustments, and pit zips.
- Numbers that matter: Hydrostatic head ≥ 10,000 mm for real rain; 20,000 mm for long storms. Breathability labeled RET or MVTR-lower RET is better (RET < 6 is very breathable; < 13 is good).
- Poncho? Works in warm rain and breathes well; less effective in wind or scrub, and awkward with scrambling.
-
Regulate as you go: Your most powerful tools are vents and zips. Use this order:
- Unzip collar/half-zip; push up sleeves.
- Open pit zips; pop front zip an inch or two.
- Take off gloves/beanie if you’re heating up; put them back on when you stop.
- Only remove a layer after you’ve tried venting. Re-build warmth before long stops.
-
Pack small, smart extras:
- Spare base top in a dry bag for emergencies or for the lunch stop. Change into it if your shirt is soaked.
- Light gloves and a beanie add surprising warmth for almost no weight.
- Buff or sun hoody for UV and wind. UPF-rated fabrics help at altitude or on water.
- For legs: breathable pants or running tights; add a windproof or waterproof pant for cold wind/rain.
Simple decision cues:
- If wind ≥ 20 km/h and temp ≤ 12°C: bring a windproof shell even if it’s dry.
- If chance of rain ≥ 30% and temp ≤ 18°C: pack a proper waterproof with pit zips.
- If you climb steeply for more than 20 minutes: start in one layer less than “comfy” at the car.
- If humidity is high (monsoon, jungle): favor synthetic base and synthetic insulation; they dry faster.
Fit and comfort tips:
- Try your full system at home: base + mid + shell. Reach up, swing arms, wear your pack. No tight spots? Hood fits over a beanie? Done.
- Mid layers with smooth outer fabric slide under shells better than fluffy ones-less bunching, easier to vent.
- Layer length matters: longer hems keep your lower back covered when bending or scrambling.
Care and longevity (2025 reality):
- Most brands now use PFAS-free DWR. It wets out sooner than old coatings. Clean your jacket with a tech wash, then reproof as needed. Tumble low heat to reactivate.
- Merino: wash cool, line-dry. Synthetics: warm wash is fine; skip fabric softener-it kills wicking.
- Patch and repair. A tiny tear in a shell grows fast in tussock or scrub.

Real-World Setups, Checklists, and Pitfalls to Avoid
Clothing is context. Here are tested combos I’ve used or seen work across different climates, plus a quick checklist so you can copy and adjust.
1) Hot and dry day hike (25-35°C, light wind)
- Base: ultra-light synthetic tee or sun hoody (UPF 30-50). Loose but not flappy.
- Mid: none, or a paper-thin fleece for shaded breaks.
- Shell: wind shirt for ridge gusts or late-afternoon breeze.
- Extras: wide-brim hat, light gloves if you burn easily at altitude, salty snacks to replace sweat.
- Notes: you’ll sweat; plan shade and water. If there’s any storm risk, a 2.5L jacket weighs little and can save your day.
2) Humid tropics or monsoon (24-30°C, high humidity, frequent showers)
- Base: fast-dry synthetic tee or long-sleeve for leech/bug/sun protection.
- Mid: thin fleece or active insulation for rest stops in wet wind.
- Shell: light 2.5L rain jacket or poncho; accept you’ll be damp-focus on staying warm enough and avoiding chafe.
- Extras: spare base in a dry bag; anti-chafe balm; quick-dry shorts; camp shirt for the ride home.
- Notes: synthetic insulation beats down here. Vent early; avoid stewing in your shell if rain is warm.
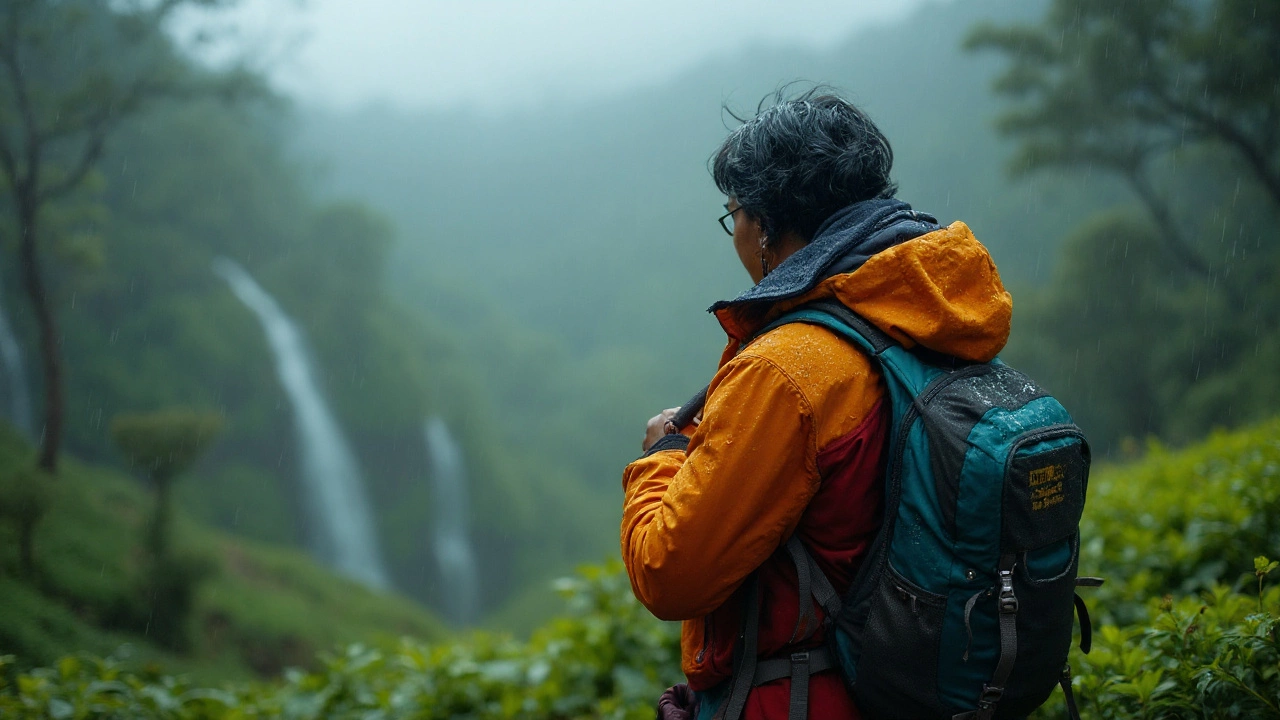
3) Temperate coastal or hill country (10-18°C, gusty; think Wellington, Wales, Pacific Northwest shoulder season)
- Base: 150-200 gsm merino or a breathable synthetic long-sleeve.
- Mid: 100-200 weight fleece or active insulation jacket.
- Shell: 3L waterproof with a wired hood and pit zips. The wind will test your hood first.
- Extras: beanie and light gloves; windproof over-trousers for long ridge sections.
- Notes: start cool. Wind is the main thief of heat-use your shell more often than you expect, even when it’s not raining.
4) Cold and dry high country (-10 to 0°C, low humidity)
- Base: heavier merino (200-260 gsm) or a synthetic thermal top.
- Mid: grid fleece + light synthetic insulated jacket; keep a warmer puffy in the pack for breaks.
- Shell: tough 3L jacket; add waterproof pants for wind on exposed snow.
- Extras: warm beanie, liner gloves plus shell mitts, neck gaiter, warm socks; keep a dry base in a sealed bag.
- Notes: layer your hands and head. If you stop for photos, put on the puffy immediately, then shed it when moving again.
5) Shoulder-season day hike with mixed terrain (5-15°C, showers)
- Base: merino 180 gsm half-zip.
- Mid: 100-weight fleece or breathable active insulation.
- Shell: 2.5L or 3L depending on scrub and forecast duration of rain.
- Extras: spare socks; thin running gloves; cap + hood combo for steady drizzle.
- Notes: half-zip earns its keep on climbs-open it wide, then close on ridge tops.
Quick try-on test at the trailhead:
- Put on base + mid. Wear your pack. If you’re cozy standing still, remove or vent before walking.
- Do 20 body-weight squats. If sweat beads form, you’re overdressed-vent or strip a layer.
- Walk 5 minutes. Adjust cuffs, neck, and zips until you feel slightly cool.
Pack checklist (layers):
- Base: worn + one spare in a small dry bag for longer or wet days.
- Mid: fleece or active insulation; pack an extra warm layer for alpine or remote trips.
- Shell: waterproof hooded jacket; wind shell if it’s dry but gusty.
- Head/hands: beanie, light gloves; add waterproof over-mitts for winter.
- Legs: breathable pants or tights; rain pants if wind or rain is likely.
Care checklist (so your kit actually works next time):
- Wash grime out of shells; dirt kills breathability. Use tech wash, reproof when water stops beading.
- Air dry your gear after the hike, even if it seems dry. Trapped sweat can mildew.
- Repair small snags with patches before they grow.
Telltale mistakes to avoid:
- Wearing cotton next to skin. Even cotton underwear can ruin your day.
- Dressing for standing still, not moving. Start cooler than feels comfy.
- Never venting. If you always wait to remove a layer, you’ll over-sweat and then freeze.
- Skipping the hood. A good hood is half the value of your shell in wind and rain.
- Bringing down as your only mid in wet climates. Synthetic is safer when storms are likely.
Mini-FAQ and Fixes When Things Go Sideways
Can I skip the mid layer? On hot days, yes. Your “mid” might live in your pack and only come out at lunch. The rule is about jobs, not the number of garments you wear every minute.
What about softshells? Great in cold, dry, windy conditions where light snow or spray is the worst you’ll see. They breathe better than rain shells, but most aren’t waterproof. In wet, go with a true shell.
Merino or synthetic base-how do I choose? If it’s a sweaty climb in warm weather, synthetic. If it’s variable temps, multi-day, or you want less odor, merino. Many folks carry one of each on trips.
Is down useless in the rain? Not useless, but risky. If it gets saturated, it loses loft. Use it on cold, dry days or keep it for breaks under a shell. Water-resistant down helps but doesn’t beat a soaking storm.
Do I need rain pants? If it’s windy, cold, or brushy, yes. If it’s warm rain on a protected trail, you can often skip them and hike in fast-dry pants or shorts.
What about leggings or tights? They’re perfect as a base for legs in cool weather. Add a wind or rain layer on top when exposed.
How warm should a mid layer be? Enough that, with your shell, you can stand around at a break without shivering. If you hike hot, choose a lighter mid and a warmer “stop” jacket in the pack.
My jacket wets out quickly-did I buy wrong? Not always. PFAS-free DWR (the new standard) beads less and needs more frequent washing/reproofing. Clean it, dry it low-heat to reactivate, then top up with a PFC-free spray-on.
What do the numbers RET and MVTR mean? They measure breathability. Lower RET = more breathable; higher MVTR = more breathable. They’re not perfect across brands, but they help compare jackets on the same shelf.
Which sources back this up? The British Mountaineering Council’s clothing advice, REI Co-op Expert Advice on layering, and the NZ Mountain Safety Council all teach the same basics. Technical waterproof ratings trace back to standards also referenced by UIAA and outdoor labs.
Troubleshooting on the trail
- “I’m soaked with sweat but I’m cold.” You vented too late or overdressed. Step out of the wind, put on your shell to block convective heat loss, swap to a dry base if you have one, and sip something warm if you packed it. Start moving again gently to re-warm.
- “A squall hit and I’m chilled fast.” Shell up, hood on, cinch cuffs and hem. If hands are wet, change to dry gloves or liners. Add your mid under the shell to trap heat. Eat something-calories are heat.
- “My ‘waterproof’ is leaking.” It might be wetting out, not leaking. Under shelter, wipe the surface and shake it. If water beads again, you’re okay. If not, keep moving to stay warm and plan to reproof later. In heavy, long rain, even great jackets feel clammy-keep your base layer wicking.
- “I overheat on climbs, freeze on stops.” Before the climb, strip to base or vent hard. Before the stop, add your mid and maybe your puffy for five minutes, then remove one layer when you start walking again.
- “Chafing and stink are ruining the day.” Swap to a dry base, apply anti-chafe to hotspots, and pick merino next time for long days. Seamless or flatlock seams help a lot.
- “Group of mixed abilities-how many layers do I bring?” Pack one extra warm layer than you think you need. Someone will move slower. A spare mid can turn a rescue into a non-event.
Next steps if you’re new
- Do a 90-minute local loop with your full system. Practice venting and timing your layers.
- Note wind speeds that make you shell up. Around 20 km/h is a common trigger for most people.
- Build a default kit list for your region (summer and shoulder season). Tape it inside your gear bin so packing takes 2 minutes.
One last thought from windy Wellington: treat your shell like your seat belt. You don’t put it on because you plan to crash. You put it on because weather can flip fast, and you want to keep the odds on your side. Do the three jobs-wick, warm, and weatherproof-and you’ll hike longer, safer, and happier.